Meta Description:
Is the GEEKOM A5 Reliable? The Honest Answer
Before buying a mini PC from a brand you don’t know well, it’s fair to ask: what happens if something goes wrong?
Here’s the reality: hardware failures are rare. Software issues are not.
The most common complaints about GEEKOM — and mini PCs in general — aren’t dead units. They’re things like:
- “BitLocker locked me out after a Windows update”
- “Windows won’t boot after an unexpected shutdown”
- “I didn’t know I needed a recovery key”
None of these are hardware failures. And all of them are completely preventable if you spend 30 minutes on backup before anything goes wrong.
This guide covers exactly what to do — right after unboxing your GEEKOM A5.
💡 Note: The GEEKOM A5 comes with a 36-month warranty (purchased through the official GEEKOM store only). Support is available in English via email at support@geekom.jp or through LINE. Purchase here → GEEKOM Official Store (Use code GEEKLAB for ¥3,500 off)
What You’ll Learn
- Save your BitLocker recovery key (the #1 thing people forget)
- Create a full system backup with EaseUS Todo Backup
- How to recover when things go wrong
- RMA process — what to do before sending your unit back
1. Save Your BitLocker Recovery Key (Do This First)
This is the single most important thing you can do after setting up your GEEKOM A5. Don’t skip it.
Why BitLocker Matters
BitLocker is Windows’ built-in encryption. It runs quietly in the background — until something triggers a security check. After a Windows update, an unexpected power loss, or certain hardware changes, Windows may display:
“Enter the BitLocker recovery key to continue.”
Without this key, your PC will not boot. No exceptions.
This isn’t a GEEKOM-specific issue. It happens on all Windows 11 PCs. But it catches people off guard because BitLocker is active by default and the recovery key is never prominently shown during setup.
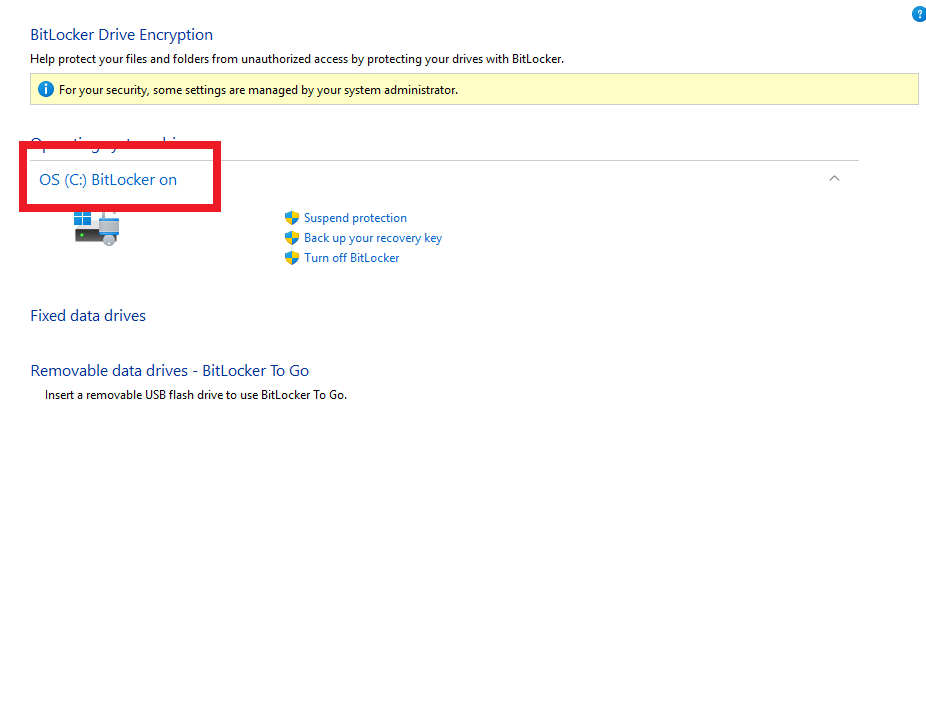
How to Find and Save Your Recovery Key
Step 1: Open BitLocker settings
Go to: Settings → Privacy & Security → Device Encryption → BitLocker Drive Encryption → Back up your recovery key
Step 2: Save it in two places
| Where | How |
|---|---|
| USB drive | Choose “Save to a file” → save to USB |
| Printed copy | Choose “Print the recovery key” → store safely |
⚠️ Important: The recovery key is a 48-digit number. Save it to both a USB drive and a printed copy, stored in separate locations. One backup is not enough.
Recommended USB drive: Keep a dedicated USB drive just for your recovery key. A reliable option:
KIOXIA 64GB USB Flash Drive (Made in Japan) 👉 View on Amazon
2. Full System Backup with EaseUS Todo Backup
Once your recovery key is saved, the next step is a full system image backup. This means if Windows ever fails to boot, you can restore everything — settings, apps, files — in about 20–30 minutes.
Free vs. Paid: Why the Free Version Falls Short
EaseUS Todo Backup has both a free and paid version. Here’s how they compare:
| Feature | Windows Built-in | EaseUS Free | EaseUS Paid |
|---|---|---|---|
| Ease of use | △ Complex | ✅ Simple | ✅ Simple |
| Same-PC restore | ✅ Yes | ✅ Yes | ✅ Yes |
| Scheduled auto-backup | △ Difficult | ❌ Not available | ✅ Easy setup |
| Backup speed | △ Slow | ❌ Much slower | ✅ Fast |
| Restore reliability | △ Moderate | △ Moderate | ✅ High |
| Cost | Free | Free | ~$35/year |
💡 The free version works for basic backups, but scheduled automation and reliable fast restores require the paid version. If you want genuine peace of mind, go with the paid version.
Step-by-Step Backup
Step 1: Get an external SSD
You need somewhere to store the backup. Choose a drive with more capacity than your GEEKOM A5’s internal SSD (512GB). A fast, portable option:
SanDisk Extreme Portable SSD 1TB Up to 1,050MB/s read · IP55 rated · 5-year warranty 👉 View on Amazon
Step 2: Install EaseUS Todo Backup (paid version)
👉 Get EaseUS Todo Backup (Paid Version)
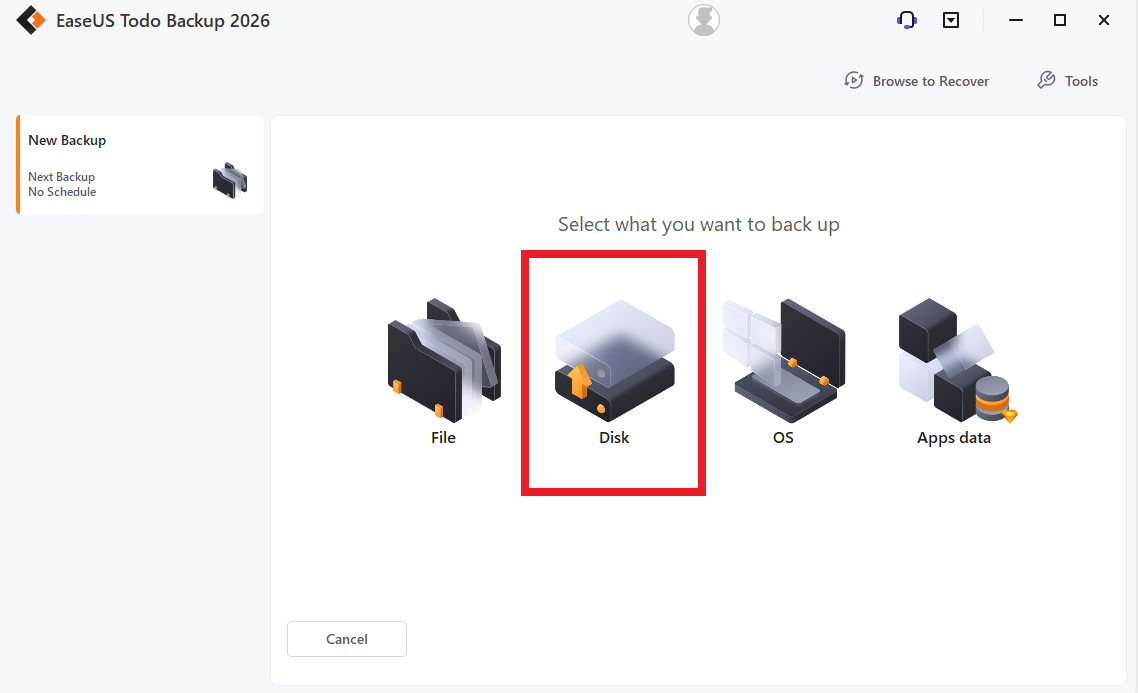
Step 3: Run a system backup
- Launch EaseUS Todo Backup
- Select “Backup” → “OS Backup”
- Choose your external SSD as the destination
- Click “Backup Now”
Allow 20–40 minutes for the first run.
Step 4: Set up a scheduled backup
Go to “Schedule” → set a day and time (weekly is fine) → Save.
💡 Best practice: Take one backup right after setup, and another after any major change (new software, Windows update, etc.)
3. Recovery: What to Do When Things Go Wrong
Software Issues (the common ones)
“Enter BitLocker recovery key” screen
- Find your saved 48-digit recovery key (USB or printed copy)
- Enter it — Windows will boot normally
- Investigate the cause; restore from EaseUS backup if needed
Windows won’t boot at all
- Boot from the EaseUS rescue USB (created within the app)
- Select your backup image
- Restore — takes about 20–30 minutes
Hardware Failure
If the hardware itself fails, GEEKOM’s warranty process applies.
Warranty Summary
| Item | Details |
|---|---|
| Coverage period | 36 months from order date |
| Who’s covered | Official GEEKOM store purchases only |
| What happens | Faulty unit replaced with new unit |
| Return shipping | Customer pays (replacement shipping covered by GEEKOM) |
| What you need | Order number + proof of issue (photos/video) |
⚠️ Important: Units purchased through third-party marketplaces (e.g. Amazon third-party sellers) are not covered by this warranty. Always buy direct from the GEEKOM official store.
Support Contacts
| Channel | Details |
|---|---|
| support@geekom.jp | |
| LINE | GEEKOM Official LINE Account |
| Response time | Usually within 24 hours |
⚠️ Note: Phone support is not available in Japan. Use email or LINE.
4. Before You Send It Back: Remove the SSD
If GEEKOM approves your RMA and you need to return the unit, remove the SSD first.
Why This Matters
Data security: Even a “wiped” drive can be recovered with the right software. Your personal data stays safe if the SSD never leaves your hands.
Instant recovery: If the failure is in the motherboard or power supply — not the SSD — your data is untouched. When the replacement unit arrives, slot your SSD back in and you’re running exactly where you left off.
RMA Process Step by Step
- Confirm your backup — make sure EaseUS has a recent system image on your external SSD
- Contact support first — ask via email or LINE whether removing the SSD is acceptable for your case
- Remove the SSD — unscrew the bottom panel, pull the M.2 SSD
- Ship the unit only — follow GEEKOM’s instructions for the return address
- Reinstall when it arrives — slot your SSD into the replacement unit and boot
💡 Tip: In some cases, removing the SSD may affect warranty terms. Always confirm with support before opening the unit.
What’s NOT covered by warranty
- Physical damage (drops, liquid, misuse)
- Repairs or disassembly by unauthorized parties
- Intentional damage
- Normal wear and tear
Quick Checklist: Do These Right After Unboxing
| ✅ | Checklist |
| Save BitLocker recovery key to USB + printed copy | |
| Get an external SSD for backup storage | |
| Install EaseUS Todo Backup (paid version) | |
| Run first full system backup | |
| Set up weekly scheduled backup | |
| Save GEEKOM support contact (support@geekom.jp) |
Thirty minutes now can save you hours of frustration later.
Related Articles
Ready to get your GEEKOM A5? 👉 GEEKOM Official Store Use code GEEKLAB for ¥3,500 off